Repairs
How difficult is it to repair your rafts?
It is not difficult at all because unlike Hypalon, most of the time, there is no requirement to buff the surfaces. The only preparation normally required is that the repair area be clean and dry and wiped with an appropriate solvent. The exceptions are with weathered polyurethane materials which need some buffing to break the extremely wear-resistant surface glaze.
A contact adhesive is used and the procedure is similar to repairing a bicycle tube.
Instructions are included in the boat repair kit, but you can also download it from our Dowload page in Manuals section.
D-Ring patches
I have D-Ring patches coming off on my raft (early 90's). How do I repair these?
The glues of the early 1990's were subject to hydrolysis (attack by water) and while in Incept's case this was fixed at the beginning of '97, that still leaves a lot of boats out there which are going to need attention.
To fix a Dee patch which has come away, first entirely remove it. If it is still holding well in places, do not damage the underlying material, but get a heat gun and heat it off.
You will need to remove the old adhesive reasonably well. 1) You can use M.E.K. and scrub away at it. Change your cloth often. It would pay to mask the area of work with a good masking tape to avoid scarring the surrounding surface. Let it dry off for an hour before applying new glue. 2) You can buff it off. We use a small 60 grit flap wheel for this sort of work but you could also use a half disc from an angle grinder (60 grit) and do it by hand. It does not have to be perfect, but do get it smooth. On the D-patch backing it is important that the stitching is not damaged -that is what holds the D-ring to the boat! Finish the buffing with a good wipe of M.E.K. prior to glueing.
I have an older (1996) Incept raft which has started leaking around the pressure relief valve. It seems to be where the valve was glued to the floor. How do I fix this? Also, is a relief valve necessary for the floor? Why does the floor have one and not the tubes?
The reason for a pressure relief valve in an inflatable floor is to limit the load which can be applied to the internal baffles which attach to the upper and lower panels of the floor. Every manufacturer knows about baffle failures from thermal overpressure! The tubes do not have the kind of stress points which the floor baffles have.
The problem above is a split in the recessed boot holding the PR valve. There is no practicable repair for the boot, the valve will need to be replaced (by a better type). We recommend and can supply VAL82.
The procedure is to cut a hole in the floor around the old PR valve boot and remove it. The hole should be at least 80mm (3 1/2") diameter. Insert the replacement valve nut and push it away clear of the work area.
Cut a circle of boat material 50mm (2") larger than the hole you cut. In it's center cut a neat 35mm (1 1/4") hole for the new valve. Glue this doughnut centrally into the floor, preferably from the inside - i.e push it through the hole cut in the floor. The reason for this is to eliminate lateral air seepage through the weave in the floor cap panel. Obviously you would glue the doughnut and let it dry before you insert it. Glue the inside of the floor panel around the hole with a small glue brush.
For glueing follow the downloadable repair instructions. Note the solvent pre-wipe. In New Zealand use our BOS08 Polyurethane Adhesive with BOS03B activator. See notes on Adhesives elsewhere on this page.
Wait 12 hours for the glue to cure.
What to use and where to buy...
All of the materials - PU (polyurethane), PU Alloy and PVC (polyvinylchloride) - used in Incept boats since 1995 can be repaired with a suitable Polyurethane boat adhesive. In New Zealand we use and recommend Bostik 777 Ultragrip and Bostik 999 Unigrip. While both of these give excellent bond strength, and can be used alone for temporary repairs, they should be mixed with activator Boscodur 5 for permanence. We supply in New Zealand only BOS08 Ultragrip 777 as Part A in 50ml, 125ml, 250ml and 1L quantities, and Boscodur BOS03B in 50ml quantity, enough for 1L of Part A.
Bostik 777 is easier to apply than 999 and is tacky for half an hour after drying (at 25 C or warmer). Bostik 999 allows a heavier film application but requires external heat to about 40 C to enable tack for final assembly. However 999 has a better initial grab and initial strength (first 24 hours) than 777. We do not supply 999.
For Dangerous Goods Transport reasons we do not supply outside New Zealand.
In the USA use Stabond - or Clifton - polyurethane adhesive two-part packs available from NRS (Northwest River Supplies) in Moscow ID. Stabond is Item 1903, and Clifton is Items 1901 and 1904.1 (both needed). Note our experience of these particular US adhesives is that you should apply two coats of mixed glue to both surfaces, 10 minutes apart in warm dry conditions - allow more time if colder.
Halkey-Roberts Inflation Valves
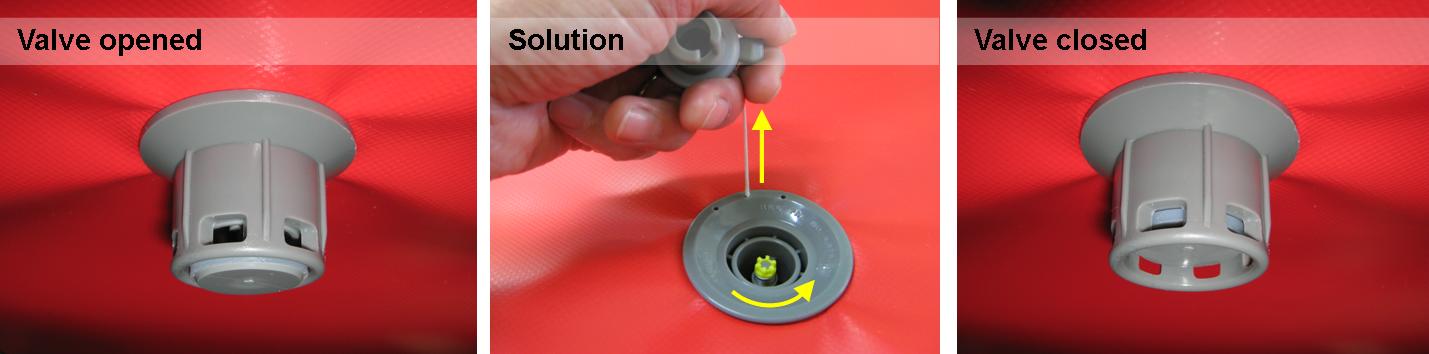
Floor valve hard to close:
When open the Halkey-Roberts valve has the valve flapper slightly protruded below the internal backing nut. When the boat is on hard ground under the valve the weight of the floor presses the flapper hard down and you cannot twist the yellow valve stem to close it.
Solution: Lift the floor off the ground, or use the valve cap and string to gently lift the valve 5mm clear of the ground, and then you can close the valve normally.
Inflate the air chamber**
Insert the valve wrench VAL49 into the valve
With the wrench, and a screwdriver in the wrench holes, loosen (unscrew) the valve about 1/2 a turn
Drop off the air from the chamber
Grip the valve nut through the boat material on the back side of the air chamber
Complete the removal of the valve with the wrench.
Locate the valve nut inside the air chamber so it is positioned against the valve hole
Hold in position from the back side of the air chamber
Position the valve through the valve hole into the nut, press down gently and reverse turn until a slight click is experienced - when you know the threads have seated and are not crossed
Screw the valve all the way with the supplied wrench
Tighten with hand strength on the wrench only (do not attempt to use the screwdriver), gripping the nut through the back as before
Inflate the air chamber
Insert screwdriver into the valve wrench and firmly tighten the valve. At this point the valve nut should grip the material and you can tighten all the way.
We have air coming out of a seam and cannot fix it. (- or) We repaired a puncture and now all the seams are leaking.
Inflatable boat materials went through a change in the 1990's away from synthetic rubbers (neoprene and hypalon) to weldable polymers.
Wicking. One of the material properties which also changed is called in the industry "wicking" (actually air seepage). Wicking is the travel of air through the centre layer of reinforced materials - a polyester or nylon scrim (strong woven material).
Most hypalon materials - at least those with lightweight reinforcement - had very low wicking rates.
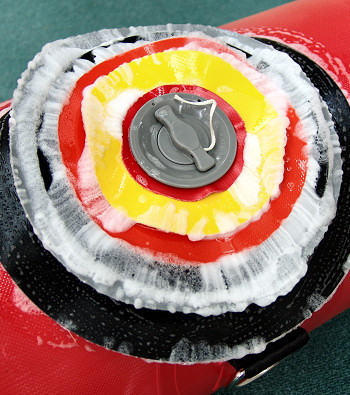
What we have done in the photo at left is fit 6 different polyurethane material samples under the valve, removed the O-ring seal, and inflated to standard operating pressure. This allows air to travel up the valve nut threads and access the valve hole at centre of each of the sample discs. The detergent solution shows the air coming from the disc edges. Some samples wick more than others but in fact they all wick.
This arrangement has exactly the same effect as when you patch a puncture on the outside. It allows air to migrate through the scrim. Air will escape through nearby panel edges (at the seams). These are not seam leaks and cannot be fixed by patching. Air will also escape from every little scratch in the outside coating (normal wear-and-tear).
Patching
On a small puncture this might mean pinching/puckering the material between your fingers so you can give the material edges a few coats of glue (allow to dry 30 minutes between coats). The first glue coat will soak into the scrim and so might the second, and with a third coat you should have a seal. Then a small patch on the outside will be fine.
Patch on the inside any larger puncture (say 25mm or more). This is not especially difficult to do and you don't have to be so careful about unsightly glue lines. Masking tape applied either side of the repair will keep the outside looking good too. If you do neat work the finished result will be all but invisible.
Repair How-to References: Repair sheet pdf. Repair tutorial (<www.oceanid.com>, go bottom of page).
Pressure Relief Valves
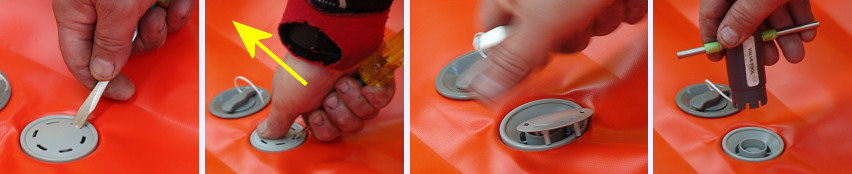
We have a slow leak in our boat coming from around the outside of the over pressure valve in the floor section.The valve seals to the boat by tightening the valve backing nut fitted inside the air chamber. Use the Incept valve wrench (Item VAL49 obtainable from Incept service centres as an accessory) to tighten the valve.
Remove the slotted screen. This is a press fit and needs to be removed with care to avoid snapping off the internal pegs. Slip the tip of a screwdriver into one of the slots holding it as shown, press your thumb into the centre of the valve, and lift your hand forward and upward in the direction of the arrow. DO NOT lever the screen off by twisting the screwdriver back.
Tighten the valve hard, with the air chamber inflated. Replace the screen. Be sure to snap the edges down securely into the valve body all round.
The valve can be serviced (cleaned of grit) by removal and flushing from the back. Follow the same procedure above. Slacken the valve a little with the air chamber inflated, then deflate before removal.
Seam repairs
There are pre-1995 Incepts and post-1995's... That's the year we had a number of advancements, not least of which was the new Halkey-Roberts inflation valve, and more importantly the year that Bostik fixed their boat glue. And there are still boats with glued seams of the pre-'95 era which are letting go. Rafts were welded after 1992 but the C42, C52 canoes and the K38 kayaks were not redesigned for welding until late 95, early 96.
In essence repairing a sprung seam is not difficult - except in difficult-to-access cases. Here are the steps to take (refer general glue-work instructions above):
- open the seam as far back as you judge wise - you may apply a little heat if you wish but don't over-do it
- scrub with MEK to get all the loose and bumpy stuff away
- get the seam laying nice and flat
- reglue generously to both sides of the seam paying special attention to the ends
- hold the seam well open for at least 30 minutes (use a stick or 4" nails etc)
- lay the seam back together
- heat and work down.
- Inflate the tube very soft (flacid) to break away any over-glue touchdowns inside the tube and leave for 12 hours for the glue to cure.
Have questions that are not answered here? Please ask us.